Yes, the Nikon D90 does exist, and with two new great features: 12.3-megapixel DX-format CMOS imaging sensor, and video. Now, take a gander at the Chase Jarvis video:
I have been planning a ten day trip, and I had to solve a problem of photo storage. Since I shoot in raw and quickly use 12 gigs of memory a day, having enough memory cards was an unprofitable solution.
I work on a tight budget, and most of my expendable income goes toward lenses and other photographic equipment. I considered the possibilities.
1) A portable storage devices like one of these: Digital Foci PST-251 Photo Safe II 80GB Digital Picture Storage Epson P-3000 40GB Multimedia Storage Drive, Viewer, and Audio-Video Player w/ 4-Inch LCD Wolverine ESP 80 GB Portable Multimedia Storage Player
2) A used laptop bought on eBay, like a ThinkPad. Cost would be at least 300 dollars, with a questionable battery.
3) A new, relatively inexpensive laptop with a small footprint and a long battery life.
I chose the the third option and got an ASUS eee 1000h. This small computer is smaller than the size of a loose-leaf notebook paper and appears to be the perfect solution.
So far these are the things I like:
The cost is four times cheaper than comparable notebooks of this size.
The build quality is impressive. It looks and feels like it could take a lot of abuse.
The screen is bright and pictures I have view appear at great resolution (ten-inch screen).
Start up time is quick. Windows XP loads in a flash.
Eighty GB hard drive which I supplemented nicely with an 160 GB portable hard drive. It has one GB of ram upgradable to two. But this computer performs well without hangups on one GB. I even installed Photoshop, and it runs snappy.
The keyboard works exceptionally well, and I can manage to touch-type even with my big fingers.
The touch pad is a dream to use, I have used others but this one seems to do exactly what I want. I thought I would want an external mouse, but the touch pad seems to work great.
Instant connections on wireless networks, and it has Bluetooth, something I may use in the future.
Battery life is phenomenal. Today I used it on battery for about four hours and it still has 60 percent charge left.
I have not figured out any negatives on this system. I have seen a few negative comments in reviews (although most were good) and those few negative comments appear groundless or very minor. This is one great machine.
So am I pleased? Yes, this appears to the perfect solution in a small package for my storage problem, and I can already see new possibilities for increasing my photo sales. More about this in the future.
Then it happens - you drop your DSLR and it is in pieces on the ground. Heartbroken, you pick up all the small parts. Is there hope?
Yes, there is. If you enter camera repair in the Google search, you will find Precision Camera comes up at the top of the list.
Last week I had the misfortune of my camera backpack opening while on my back. I heard a thump and looked down to see my D80 broken and in pieces. I carefully recovered the parts and did an online estimate for repairs.
Precision Camera quickly came up with an online estimate of 248 dollars, which included return shipping. I paid the estimate and sent the camera off along with a bag of the parts that had been spread on the ground.
I sent the camera on a Wednesday and checked the online progress. Precision received the camera Friday. It went into repairs on Monday and was headed back to me on Tuesday. By Friday, I had the camera back in my hands, in time for an important photo shoot on Saturday.
So how did Precision do, besides the very quick turnaround? Excellent. The camera was returned to factory specs, everything was recalibrated, they did a superior cleaning job both inside and out (including the sensor) and the camera software was updated.
The camera looked as good as it did when I first purchased it. Function-wise, everything was put back in exceptional order. They did a great job.
Precision Camera Repair is an authorized factory repair site for all leading brands of cameras. By the way, they even repair lenses. I truly expected a second higher estimate after they saw what bad shape my camera was in, but I never got that email and they performed the repair at the original online estimated price.
This was my second experience with Precision Camera, I had a Sony H5 that was still under warranty which they repaired, quickly and exceptionally well. Thus I had a great deal of confidence that they would repair my Nikon with the same high professional standard. I highly recommend if you break a camera or have a broken camera to give them a try.
Here you will find a crash course in digital lighting. Go to each of the sites in order, and you will absorb in lightning speed a quick understanding of the principles of camera lighting.
Step 1. Strobist Preliminaries One great little video, given a five star-rating with 96,000 views.
One comment on this video was: "In a mere seven minutes and fifty-one seconds you taught me everything I've been trying to learn during the last 5 months." Suddenly you will have the starting blocks to understand strobe photography.
This video is from the great strobist site Strobist: Learn How to Light. They have a good index of posts for further learning.
Step 2. Dave Black Photography has some great information on the practical use of speed lights outdoors. I find his advice very useful, as well as some pointers on how to position the speed lights. You can also find an excellent tutorial by Dave in the Nikon Learning Center.
This article is about current research of building a camera sensor like a human eye. Since the beginning of photography, images have been projected on a flat surface. This could soon change and usher in a new breed of cameras that may force extinction of the cameras we use today.
IBM is rolling out a new laptop targeted for the photographer. One interesting feature of this laptop is built-in Wacom tablet. Another interesting feature - super-bright 1920 x 1200-pixel, 400-nit WUXGA display with up to twice the brightness of earlier ThinkPad laptops.
A new, hopeful magazine is closing up shop. Built on the model of JPG Magazine, EveryWhere Magazine has failed to establish a customer base. Read this article to see what happened to this offshoot of JPG magazine. Sometimes when one door closes, another opens.
Did you Know?: JPG Magazine pays 100 dollars for pictures that are published in their magazine and also pays for photo stories. You may want to get an account and try your luck. I have been published there and so can you.
"Dreams are like the paints of a great artist. Your dreams are your paints, the world is your canvas. Believing is the brush that converts your dreams into a masterpiece of reality." -unknown-
We all have dreams. Sometimes they can become reality. Sometimes they are so far off that the vision disappears and we never arrive. A dream is almost like a mirage.
Sometimes when we try to reach it, it simply disappears before our grasp, but we keep trying. We keep seeking. And part of the joy is the journey.
Perhaps they will be mirages and just disappear like a reflection in the water, like when the butterfly reaches out to touch his reflection and finds there is not another butterfly there.
"The dream was always running ahead of me. To catch up, to live for a moment in unison with it, that was the miracle." -Anais Nin-
Then I met this man on the lake of dreams. He told me something about himself. He told me how he came to this lake to dream. He talked about how he saw a deer everyday who swims across the lake. And then he told me of his dream.
He dreamed of having a boat so he could cross the lake like the deer. He told me as he watched a small boat on the other side of the bank. The boat was distant and could barely be seen on this overcast day. You could see in his eyes his dream, how he would love to be on a boat. To wander near the far banks. To see what life was like on the other side. His dream.
He was an old man with a young dream. And to him it was a dream that would never be. It was always slipping from his grasp, disappearing before his very eyes. He has been dreaming this dream for years, wishing for his boat to take him places he has never been.
"I learned that there were two ways I could live my life: following my dreams or doing something else. Dreams aren't a matter of chance, but a matter of choice. When I dream, I believe I am rehearsing my future." --David Copperfield
When I left the old man I walked down the bank and around the bend. Sitting there was a derelict canoe that sat there rubbing against the bank. Perhaps lost or abandoned, it sat there, the vision of the old man's dream just out of sight.
I have thought of the old man and wondered, did he find his dream? Or did it just remain out of his sight, and his dream continued to be a mirage? I also wondered if the boat was lost from its owners who would find it, but it was most likely abandoned.
I do wonder if the old man's dream became real or if it continues to be a mirage in his thoughts.
I hope you all find beauty beyond your wildest expectations, that you feel the pulse and flow of nature that I so much enjoy. I hope that your spirits and creativeness leads to new avenues of wonderment and that you find amazement in this thing we call life. Peace.
If you have a point and shoot camera, you can compete with those who have the fancy DSLR's. Some of my best and most profitable shots were made with the Sony H1 through H5 cameras. These cameras were particularly great for landscape shots.
The picture is of my old Sony H1 Camera with the telescope extender attached.
1. Use the timer on your camera. You will have less blurry shots - the camera moves when you press the shutter. Also, hold your breath while you shoot.
2. If you see a beautiful shot in front of you, also look behind you. You might be surprised by what you are missing.
3. Look at the lights and shadows. Having great light and shadows in your shots adds a natural feel of three dimensions.
4. Use the bracketing feature of your camera. If you take three exposures at different EV settings, you will be able to decide what is the better exposure. (EV is exposure value. EV compensation tells the camera to expose at a higher or lower setting than it thinks is right.)
5. When you compose your shot, think foreground, mid-ground, and far-ground. Look to see how the eye will be led through the picture.
Red-Tail Hawks are not easy subjects. If you have a long lens, your chances are better at getting good shots. But if you do not have a long lens, you have to learn how to get close.
2. Hawks like a variety of settings. In the mountains, think like a hawk - where would they get the best vantage point to spot prey? - and look there. Look for the position of the sun and how it shines down the mountain sides. Trees above these areas are favorite spots for Red-Tail Hawk perches. On paths, look on branches of tall dead trees. They like the unobstructed views when limbs are bare. Look at the top of telephone poles for the same reason.
3. Listen for birds having a commotion. Other birds, especially crows and mockingbirds, will cause quite a fuss when a Red-Tail is in their territorial area. If you hear a big commotion, chances are they are harassing a Red-Tail.
4. When you see a Red-Tail in flight, watch where it goes. Chances are they did not go far and you can reach the spot they flew to with a short walk.
5. Red-Tail Hawks are really not afraid of you. More so they are just bothered by your close presence. When trying to get closer, do not hide from a Red-Tail. Believe me, they saw you a long time before you saw them. Let a hawk evaluate your presence. The Red-Tail will decide how close you are allowed to get. If you are lucky and they are eating prey, your chances of getting closer are greater. Approach a few steps at a time, then stop and take some photographs. I find it helps if I talk to them in a soothing, quiet voice as I get closer. Be sure to take some photographs each time you stop. A Red-Tail can take off at any moment. Follow their flight - they may only fly a short distance.
6. On rare occasions you can befriend a Red-Tail, and when this happens they will know you and let you into their world. This is the ultimate Red-Tail Hawk complement.
How to befriend a Red-Tail:
Let me tell you a short story of how this happened to me. In the pictures through this story are pictures of the same Red-Tail that I took over a two-day period. I first met this Red-Tail while he was eating a squirrel on a limb. He was not really anxious to leave his meal so he let me stay. I took hundreds of photos and stayed with him over an hour, within ten feet of him.. I talked to him often in a calm voice. I felt a connection, and apparently he did also.
The next day I was walking down the same path and spotted him on a limb. He was not eating this time, but looking for prey. He allowed me to get very close, within five feet. I was able to stay there with him for several hours. Then I saw him dive in some underbrush. He had caught a mole and flew in a close-by tree and let me watch him dine. I had gained his trust the previous day, and that bond of trust did not disappear.
Whenever I walk the same path, I am allowed to approach and share some kind words with him.
Adobe Photoshop to me is a constant learning process. I have only scratched the surface of what can be done with this fabulous program. As a constant student, I am always interested in new ideas of how people use the program. And even if I do not use their technique myself, some of what is done is fused in my mind, more on a subconscious level.
And when I look at an image and see where I want to go with it, I have more of an intuitive, and counter-intuitive approach of how I reach that result. After all, if we all used the same techniques, all our photos would have the same monotonicity. They would lose impact. You may become the master of the technique but at a loss of your creative edge. And ultimately, your images would drift into the sameness of the collective whole.
An example of this is when everyone was using the flood program,
It was catchy for awhile, and I even have some photos that I applied this to in my Flickr Archives. This photo at one time had reached number 1 in interestingness, had over 2,600 views, and 95 called it a favorite. At most it was a cheap trick of an easy program to use.
I have had better photos, and perhaps my best, Foggy Wood, has had over 1,100 people call it a favorite, and nearly 67,000 views. Why? Because this photo has genuine impact. It separates itself from the pack of any my photos, and perhaps many other excellent photographs. This in part was a fluke. Foggy Wood is 90 percent the composition and the shot, and 10 percent processing. I remember when I processed that shot it took less than five minutes. And believe it or not, I did not even have Photoshop. It is the kind of picture when "God presses the shutter," as Ansel Adams would say. At least it felt that way to me.
The point is to gain impact, to absorb what others are doing and then strike out on your own. When you take that great shot, and you will, the processing will fall just in place, like falling dominoes.
Now, I am going to recommend a site that has some excellent Photoshop videos. I recommend that you just watch them and absorb. Don't worry if you don't get the technique down pat. Remember you are adding this to your creative intuitive reason, and when you get into the flow of processing you will use what you need naturally.
By the way, the book below is my favorite Photoshop Book.
Personally, I do not use in camera sharpening. I shoot in raw and I do all the adjustments myself.
Sharpening the image is one of the first steps I do, and in some images having a great sharp image is more than impressive. I took the picture on the left and applied the method below.
First step as always: Make a new layer.
Then go to the filter menu on top. OK, that Sharpen filter is there, but remember what your mama told you: "Don't touch!"
You are going to meander down all the way to Other. This is the place your mama didn't tell you about. Click, and head to High Pass. Once you open High Pass, move that slider over to 10.0.
Now, I bet you are wondering why didn't I listen to mama and and go to sharpen. Have no fears, and go to the Overlay blending mode for your layer and click Overlay (sometimes I use Soft Light). Click that and your mama will be impressed with your sharpening. Now, use the Opacity slider to get it where mama likes it.
Flatten the layer, and use whatever noise reduction filter you use. I use Imagenomic - works great for me. And now you have a sharp yet soft image with a smooth texture that every mama will love.
Thanks to Birdtoes for teaching this sharpening technique.
It is my pleasure to announce my photo Foggy Wood will be appearing in this National Geographic Book. Simply Beautiful Photographs by Annie Griffiths Belt
If you would like to donate to my photography and blog, only one dollar donations are accepted
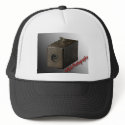
Inspire curiosity with this hat that features the first Kodak film camera for the masses. The camera was first produced in 1888, and had a wind up screw on the top,for the just invented rolled film. It held 100 pictures and you sent the whole camera back to the manufacturer for film development. Then, they would return the whole camera back ready for another 100 pictures.
Dark Gulch Beach
-
1bluecanoe posted a photo:
[image: Dark Gulch Beach]
Mendocino, California. First trip that camera and drone stayed home. This
was to be a journey of sc...
A Thousand Years by Kris Kros
-
Kris Kros posted a photo:
[image: A Thousand Years by Kris Kros]
Yosemite is a land where you will find beauty and tranquility in one place.
Its natural...



 Stumble It!
 Stumble It!


.jpg)





 Posts
Posts